Saturday, October 29, 2016

Image Editing Using GIMP

You may have seen outputs of a few of the projects in the past. I have created this 640x480 image using GIMP. Graphical Image Manipulation Tool allows you to work with layers and create appealing posters or banners. If you are new to graphics this is the place to start your work in it.

Created this picture:


As can be seen... these images were opened as layers scaled,rotated,sheared and translated and blended with other layers with different opacity and blending mode while merging. All these are skills you could hone to make a living as a graphic designer.

Contractive Affine Transformations

It is too much of an effort to reproduce the theory behind this but suffice is to give a link to this page and this page. Now I will show you a C-curve I produced using a method called contractive affine transformation in Java OpenGL.

Snapshot:

A small change in the iteration can produce the Dragon curve:
 The change is in the display function:
gl.glBegin(GL2.GL_POINTS);
    for(int i=0;i<100000;i++)
    {
        switch(rand.nextInt(2))
        {
        case 0:
            x1=(x+y)*0.5f;
            y=(-x+y)*0.5f;

            x=x1;
            break;
        case 1:
            x1=(-x+y)*0.5f+1;
            y=(-x-y)*0.5f;

            x=x1;
            break;
        }
        gl.glVertex2f(x, y);
    }
Snapshot:

Here is the source for the C curve.
Another modification I thought would be useful is the fractal "Scroll".
Snapshot:

This is the code to generate it:
 gl.glBegin(GL2.GL_POINTS);
    for(int i=0;i<100000;i++)
    {
        switch(rand.nextInt(2))
        {
        case 0:
            x1=0.693f*x-0.4f*y;
            y=0.4f*x+0.693f*y;

            x=x1;
            break;
        case 1:
            x1=0.346f*x+0.2f*y+0.693f;
            y=-0.2f*x+0.346f*y+0.4f;

            x=x1;
            break;
        }
        gl.glVertex2f(x, y);
    }
    gl.glEnd();

Friday, October 21, 2016

CUDA bit-reverse template demo

I have Nvidia GEFORCE with CUDA graphics card with the 410M processor. I suppose this configuration is the oldest processor in the NVidia family of graphics cards. I feel I am lucky as I had this processor shipped in my laptop by sheer serendipity. I happen to know a little bit of game programming so would like to try my luck at developing with CUDA. It is a parallel computing platform and programming model. When Nvidia introduced CUDA it stood for compute unified device architecture.

I researched a bit on installing Nvidia CUDA and found that first Nvidia drivers need to be installed(which were'nt there). Then I installed the CUDA 5.5 toolkit. I chose the 5.5 version because my Ubuntu 14.04 LTS version with Nvidia GEFORCE 410M processor would only support that version of toolkit.

After much helter-skelter I found that you could not do programming with CUDA in normal eclipse. You needed the Nsight Eclipse. I downloaded all of these and finally I was ready to run a CUDA program. Found that C programs in CUDA have .cu extension.
Went to file-> New Project-> CUDA C/C++ Project
Gave a name to the project.
In the next screen let the defaults as it is:
In the next screen clicked finish.
Then right clicked on the project name->New->Source File
Then in the interface give a name to the file with .cu extension. You may choose any template of your choice and as I am new to CUDA I just let the default as it is(Bit-reverse demo template). With this basic experience in running a bit reverse program whose output looks like
Input value: 0, device output: 0, host output: 0
Input value: 1, device output: 128, host output: 128
Input value: 2, device output: 64, host output: 64
Input value: 3, device output: 192, host output: 192
Input value: 4, device output: 32, host output: 32
Input value: 5, device output: 160, host output: 160
Input value: 6, device output: 96, host output: 96
Input value: 7, device output: 224, host output: 224
Input value: 8, device output: 16, host output: 16
Input value: 9, device output: 144, host output: 144
Input value: 10, device output: 80, host output: 80
Input value: 11, device output: 208, host output: 208
Input value: 12, device output: 48, host output: 48
Input value: 13, device output: 176, host output: 176
Input value: 14, device output: 112, host output: 112
.
.
(so on upto 255)
I was a bit encouraged to try and develop parallel fast games using CUDA.
Wondering what this device and host mean. To hazard a guess the device means the Graphics card and the host means the Main CPU. Feeling too tired to try and understand the code. I hope you understood what the program does.
If interested you can download the program from here. Thank You :-)
Update:
Something says me to develop this project further. I am looking to parallelize some of the games that make use of the CPU so that they run faster. For the present my interest is in rendering fast the shadow polygons in the scene, I heard this requires significant computational overhead and existing algorithms are not good enough.

Sunday, October 16, 2016

Noisy texture to a polygon using procedural noise

It is very easy to generate noise using methods mentioned in this site. By using functions smoothNoise, turbulence etc mentioned in the site, It was quite straight--forward to generate the following noisy texture. I am doing this in Java- bindings for OpenGL.

Snapshot:


Here is the source.

Further modification of the program to generate textures such as mixture of sin wave and noise as mentioned in the same site gave the following result.

Snapshot:


The modification in the above program was replacing turbulence function by:

 for (int y = 0; y < 128; y++) {
            for (int x = 0; x < 128; x++) {
                // to do use a formula here to create a texture
                value=(1 + Math.sin( (x + turbulence((double)x ,(double) y,64 ) / 2 ) * 50) ) / 2;
                int red=(int)((0xff)*value);
                int green=(int)((0xff)*value);
                int blue=(int)((0xff)*value);//*(x^y);
                buffer.put((byte) ((0xFF)&red));     // Red component
                buffer.put((byte) ((0xFF)&green));      // Green component
                buffer.put((byte) ((0xFF)&blue));               // Blue component
                buffer.put((byte) (0xFF));    // Alpha component. Only for RGBA
            }
        }

in the init function.
The explanation in the site upvector.com is much clearer and you can refer that as well.


Similarly the following formula(done in a different way) for value yields this pattern:

xyValue = x * xPeriod / noiseWidth + y * yPeriod / noiseHeight + turbPower * turbulence(x, y, turbSize);
value = (1+Math.sin(xyValue * 3.14159))/2;
Where the following variables have to be defined before hand:
           //xPeriod and yPeriod together define the angle of the lines
           //xPeriod and yPeriod both 0 ==> it becomes a normal clouds or turbulence pattern
           double xPeriod = 5.0; //defines repetition of marble lines in x direction
           double yPeriod = 10.0; //defines repetition of marble lines in y direction
           //turbPower = 0 ==> it becomes a normal sine pattern
           double turbPower = 5.0; //makes twists
           double turbSize = 32.0; //initial size of the turbulence

With these variables the following wooden texture was obtained:

double xyPeriod = 12.0; //number of rings
double turbPower = 0.1; //makes twists
double turbSize = 32.0; //initial size of the turbulence
And in the loop:
                double xValue = (x - noiseWidth / 2) / (double)(noiseWidth);
                double yValue = (y - noiseHeight / 2) / (double)(noiseHeight);
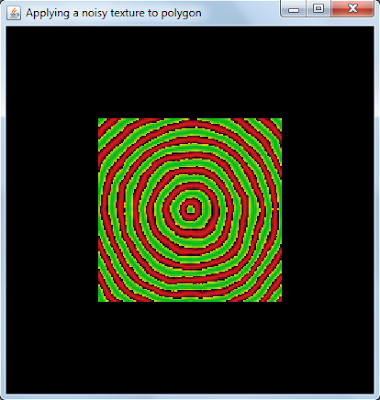
                double distValue = Math.sqrt(xValue * xValue + yValue * yValue) + turbPower * turbulence(x, y, turbSize);
                double sineValue = Math.sin(2 * xyPeriod * distValue * 3.14159);
               
                int red=(int)(0xff+(0xff)*sineValue);
                int green=(int)((0x20)*sineValue);
                int blue=(int)((0x20));//*(x^y);
                buffer.put((byte) ((0xFF)&red));     // Red component
                buffer.put((byte) ((0xFF)&green));      // Green component
                buffer.put((byte) ((0xFF)&blue));               // Blue component
                buffer.put((byte) (0xFF));    // Alpha component. Only for RGBA

Here is the texture output: